While messing around with Haxe and OpenFL, I struggled to find an up to date and complete reference of how to setup a development environment on Visual Studio Code that would easily build and run a project for the selected platform. I think a lot of OpenFL developers use the HaxeDevelop IDE, which has everything related to Haxe ready to go, but I wasn't keen on having yet another editor installed just for Haxe. As much as I like the Haxe language for targeting multiple platforms, I like VS Code for targeting multiple development environments. I also really like the Vim plugin for it.
I'm assuming the development platform to be Windows 10, Haxe (4.1.3 in my
case) is already installed, and the haxelib command is working as expected.
DISCLAIMER: I'm not very familiar with the Flash environment and Action Script in general and this is just the process I, as a beginner in Haxe and OpenFL, went through to get VS Code to build and debug projects targeting HTML5, Desktop (with HashLink), and Android.
Installing OpenFL
The OpenFL install docs is a good place to start.
Open a command prompt and install OpenFL:
haxelib install openflThis will install OpenFL and its dependencies, such as Lime (important).
Make openfl a command you can use anywhere:
haxelib run openfl setupNow check that the openfl command works:
PS U:\Dev> openfl

 .d88 88b.                             888888b 888
d88P" "Y88b                            888     888
888     888                            888     888
888     888 88888b.   .d88b.  88888b.  8888888 888
888     888 888 "88b d8P  Y8b 888 "88b 888     888
888     888 888  888 88888888 888  888 888     888
Y88b. .d88P 888 d88P Y8b.     888  888 888     888
 "Y88 88P"  88888P"   "Y8888  888  888 888     "Y888P
            888
            888

OpenFL Command-Line Tools (8.9.7-Lpv3od)
Use openfl setup to configure platforms or openfl help for more commands
It should also already be able to run (at least) HTML5 projects from the command line. Test it by running one of their example projects.
List examples:
openfl createBuild and run the DisplayingABitmap example on HTML5:
openfl create DisplayingABitmap
cd DisplayingABitmap
openfl test html5
So far, it's all in the official documentation. What I was expecting after
that was it to tell me how to set it all up with building and debugging in VS
Code, but all I found was a link to the editor and an extension for something
called Lime that provides code completion and template configurations for
targeting, building and debugging.
As I understand, OpenFL heavily relies on the Lime API, which manages windows, rendering, sound, and other low-level systems. Depending on the target runtime, Lime can be a Haxe or a C++ (not generated by Haxe cpp compilation) library. Lime itself can have native dependencies such as SDL2 and OpenAL.
For VS Code to integrate well with OpenFL, we need to install the Lime VS Code extension, so go ahead and install it. Make sure you also have the Haxe Extension Pack installed, while you're at it.
The extension uses the lime command to build and run projects. The lime
library should have already been installed along with the openfl library.
To setup the lime command we just need to run this command:
haxelib run lime setupTest the new command:
PS U:\Dev> lime

_/\\\\\\______________________________________________
_\////\\\______________________________________________
_____\/\\\_____/\\\_____________________________________
______\/\\\____\///_____/\\\\\__/\\\\\_______/\\\\\\\\___
_______\/\\\_____/\\\__/\\\///\\\\\///\\\___/\\\/////\\\__
________\/\\\____\/\\\_\/\\\_\//\\\__\/\\\__/\\\\\\\\\\\___
_________\/\\\____\/\\\_\/\\\__\/\\\__\/\\\_\//\\///////____
________/\\\\\\\\\_\/\\\_\/\\\__\/\\\__\/\\\__\//\\\\\\\\\\__
________\/////////__\///__\///___\///___\///____\//////////___

Lime Command-Line Tools (7.8.0)
Use lime setup to configure platforms or lime help for more commands
There's still some configuration left to do with the lime command, but for now we can start a new OpenFL project with VS Code.
Starting A New OpenFL Project
I didn't find an option to create a new Lime or OpenFL project from within VS Code, so we'll use the command line for that.
Create a new empty project:
openfl create project NewOpenFLProjBefore opening VS Code, create a folder named "Assets" within the new
project. The openfl command doesn't generate one in my case, and the lime
extension complains if it doesn't find it.
cd NewOpenFLProj
mkdir Assets
Also, I believe the generated .hxproj file is meant to be used by HaxeDevelop,
so we don't need it.
rm NewOpenFLProj.hxprojNow open the project on VS Code.
code .Building
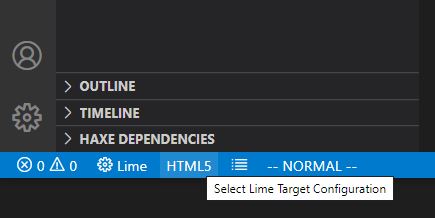
In the file hierarchy, there should be a project.xml file, a Source
folder with a Main.hx file and the empty Assets folder we created. The
target Lime configuration is displayed at the left of the bottom bar and you
can choose the target by interacting with it.
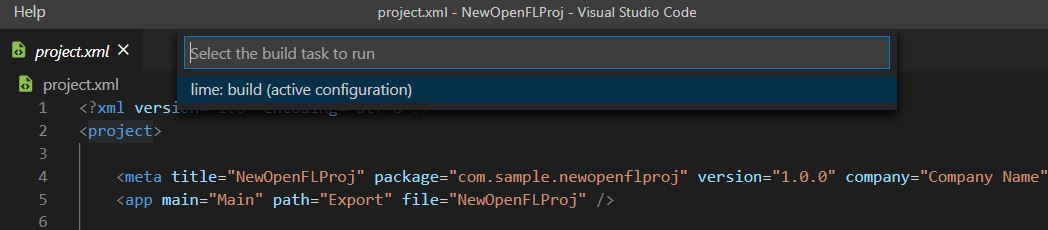
Right now, we can use Ctrl-Shift-B to build the project like we did in the
command line, but VS Code will ask which build task to run. This task builds
the project for the target Lime configuration we previously selected, i.e
"active configuration".
Go ahead and run it. It will generate the Export directory where all the
builds for any of the targets will be located. As far as I know, The
Export folder can be deleted at any time, but you may not want to do this
regularly if you target a native platform since the C++ compilation can take
a long time when done from scratch.
To make this our Default Build Task, select on the top bar
Terminal->Configure Default Build Task...->lime build (active configuration).
This will create a .vscode directory with a tasks.json
file. Leave the default values and enter Ctrl-Shift-B to build it once more
(this time, without the prompting).
Just so there's something going on on the screen, here's this simple Main.hx file
that rotates a red square in the middle of the screen.
package;

import openfl.events.Event;
import openfl.display.Sprite;

class Main extends Sprite {

    public function new () {

        super ();

        var square = new Sprite();
        square.graphics.beginFill(0xAA5555);
        square.graphics.drawRect(-50, -50, 100, 100);
        square.x = stage.stageWidth/2;
        square.y = stage.stageHeight/2;
        addChild(square);

        function rotate(_) {
            square.rotation += 1;
        }

        stage.addEventListener(Event.ENTER_FRAME, rotate);
    }
}
Build it again. The openfl test html5 command can still be used to test the
application. Since we cannot just load the generated index.html file in the
browser for this to work, it will start a web server. Cancel out of it with
Ctrl-C.
Running
Now we need a way to run the app with a single button press. Similar to the
building configuration, the Lime extension provides us with a launch
configuration. Select Run->Add Configuration->Lime. This creates a
.vscode/launch.json file that will be read when we press F5 (Start
Debugging) or Ctrl-F5 (Run Without Debugging).
The Lime extension provides us with many different types of tasks, such as
build, run, test, clean and update for each target. You can list all by going
to Terminal->Run Task...->lime. To run one, select it. From my tests,
the lime command seems to do essentially the same as the openfl command
when creating, building and running projects.
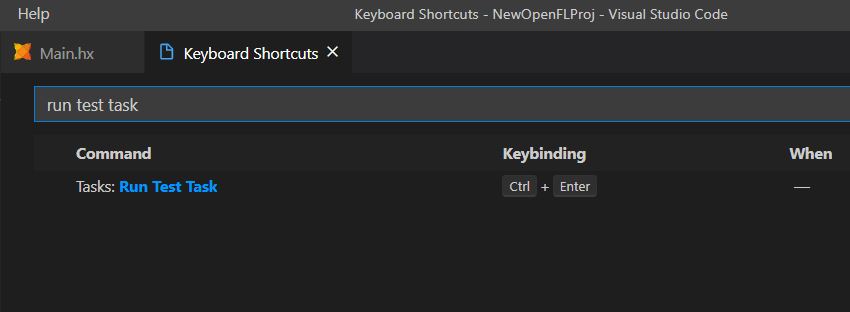
The Lime extension documentation suggests that we bind the Run Test Task to
a keyboard shortcut such as Ctrl-Enter to run lime test quickly. Here's
how to do that:
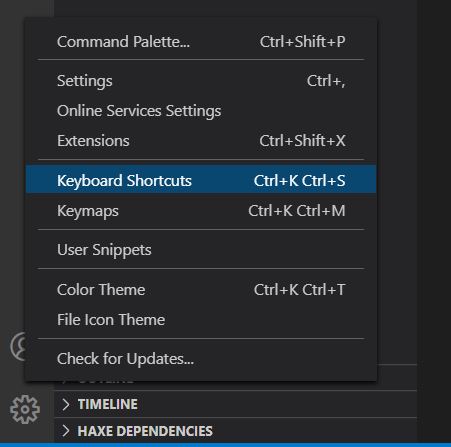
Click the settings icon on the bottom left of the window and select Keyboard
Shortcuts.
Search for Run Test Task and configure the shortcut.
This still requires you to confirm the task, but since you'd already be hovering the
Enter key, maybe it's not so bad. Alternatively, we could configure the test task to
be the default build task, since it builds and runs the project.
Platform Specific
HTML5
To build and test the html5 target, we don't need any special configuration. To debug it, you'll need to install either the Debugger for Chrome extension or the Debugger for Firefox extension. Although, Lime would complain if I didn't have the Chrome extension installed, even if I was only going to need the Firefox one.
No special setup was necessary with the extensions, other than selecting the target browser to test on from the extension settings (defaults to Chrome). I couldn't make the plugin work with regular Firefox, only with Firefox Developer Edition. Chrome debugging worked without any issues.
Test debugging:
- Add a breakpoint somewhere in the code
- Make sure the target is set to
HTML5 / Debug - Run the project with
F5.
Desktop
I used HashLink virtual machine for the desktop
build. The build generates a .hl file and it is executed with the hl
executable. OpenFL changes the name of the .hl file to hlboot.dat, which
is a file the hl executable automatically looks for in the same folder. It
also changes the name of the hl executable to the project name, so that it
seems it is THE project executable. Here are more details on HashLink
distribution and
packaging.
When writing this post I originally thought that it was necessary to download
and install HashLink on the system, but it appears that OpenFL and Lime do
all the setup you need. I installed HashLink when I was testing out
Heaps and assumed OpenFL was using the one I installed,
but it seems OpenFL does its own thing since it uses the Lime backend,
instead of SDL2 (with hlsdl lib) or something else.
Great! No setup required, except for changing the target.
Test it out with Ctrl-Shift-B and F5/Ctrl-Enter. A window should open up.
Android
To build the project for Android, the process is a little more involved. Lime needs to make use of an Android SDK, an Android NDK and a Java JDK. Then it generates a Gradle (A Java build/dependency system) project. I don't know the specifics of how it all works, but since it uses the NDK, it must be building our entire project natively (from generated C++ code, except for maybe Lime) into a dynamic library, then loading it from Java when the application starts.
For the JDK, I already had one installed from AdoptOpenJDK. It was the most straight forward JDK install I've ever done and I never had an issue with it since. I used OpenJDK 11 (LTS) HotSpot. You could also try using the JDK that comes with Android Studio, but I haven't tried it.
I believe the easiest way to have an Android SDK and an NDK is to install Android Studio and use their SDK Manager tool to download the SDK and NDK versions that Lime requires. I know, it's yet another editor for a specific thing, but I didn't feel like going through Google's convoluted docs to find out if it was even possible to download only what I need. Also, I already had it installed.
Lime's documentation on
Android setup has all we
need. From the time of writing this post, it requires that we install
Android SDK platform-tools, Android API 26 and NDK version r15c.
With Android Studio installed, open it. You don't need to create a new project.
Just click on Configure->SDK Manager (or Tools->SDK Manager if on a
editor window).
Here's how my downloads look like:
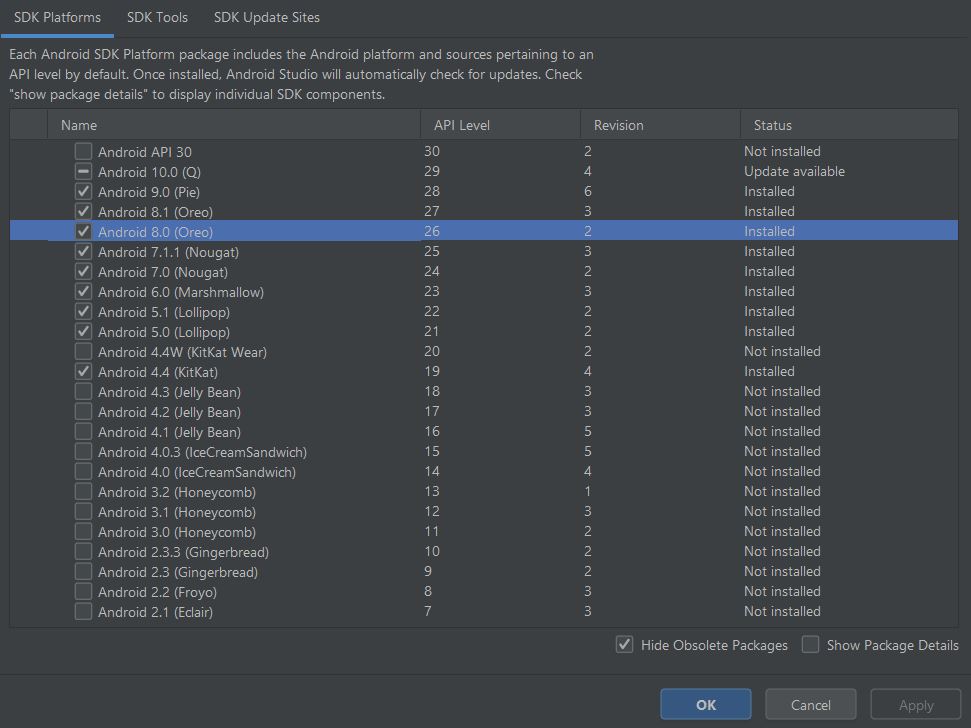
We don't need all those API versions. I had them all downloaded from a day
Unity was just refusing to build a project. All we need from the SDK
Platforms tab is Android 8.0 (Oreo) (although later on when we setup Lime
on the command line, it seems to ask for Android API 19, i.e 4.4 KitKat).
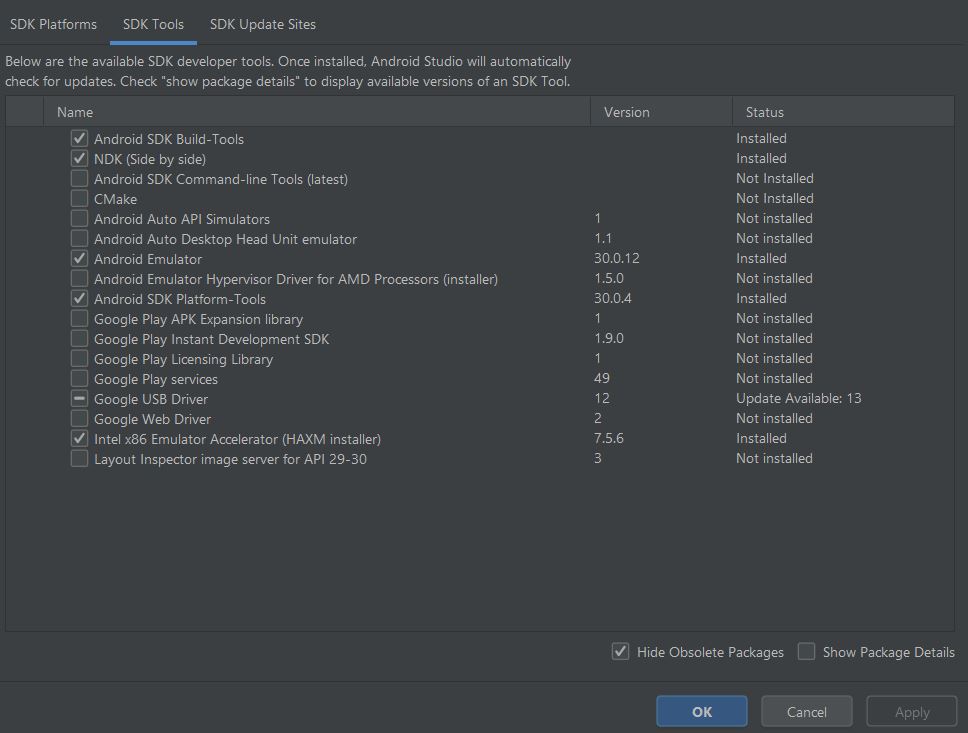
From the SDK Tools tab, we need Android SDK Build-Tools,
Android SDK Platform-Tools and NDK (Side by side). I don't think the NDK
version installed is the version Lime was requiring, but it seamed to work
fine from my tests.
Once everything is installed, we need to tell lime where to find all those libraries. Have the paths for each one ready:
- Android SDK: SDK Manager has the path to it at the top. Usually in the
APPDATAfolder, e.gC:\Users\<username>\AppData\Local\Android\Sdk - NDK: Found inside the SDK path, e.g
C:\Users\<username>\AppData\Local\Android\Sdk\ndk\21.3.6528147 - JDK Install folder, e.g
C:\Program Files\AdoptOpenJDK\jdk-11.0.7.10-hotspot
Open a command prompt, start the Android Lime setup and enter the paths for each:
PS U:\Dev> lime setup android
In order to build applications for Android, you must have recent
versions of the Android SDK, Android NDK and Java JDK installed.

You must also install the Android SDK Platform-tools and API 19 using
the SDK manager from Android Studio.

Path to Android SDK []: <Android SDK Path>
Path to Android NDK []: <NDK Path>
Path to Java JDK []: <JDK Path>

Setup complete.
Now that Lime knows where stuff is, we can build our project targeting Android.
The first build takes about 10 minutes on an Intel i7-3770k since it has to compile the project, OpenFL, Lime and Haxe source files. Next builds are much faster, but still slower than using HashLink or HTML5 targets.
Set the target to Android and build the project with Ctrl-Shift-B. Watch
some text go by in the terminal and it should finish with a BUILD SUCCESSFUL message.
To run it, we can use the Test Task (mine is configured to Ctrl-Enter)
while an Android device is connected to the computer. You might need to do
some extra steps before being able to execute an APK on a connected Android
device, such as unlocking developer mode, allow USB debugging and possibly
installing USB drivers (found on SDK Manager). But once it is all set up, the
Test Task should just work, finding your device and running the app on it.
Another way to run it is to open the generated project at Export/android/bin
(build.gradle file location) with Android Studio and launch it from there.
Unfortunately, I wasn't able to debug the app while running it on my device.
I tried debugging the project with the target set to Android / Debug, but
the Lime extension doesn't support debugging Android. The Debug target
provides some terminal output from the device, but it seems to be a general
system log.
Wrapping Up
Now that it's all setup, we can start learning the OpenFL API and make stuff with it. Unfortunately, there aren't a lot of up to date tutorials out there, so I know I'm going to have to look for bits of information scattered around in older guides, GitHub, forums, etc.
I think I'll start out with the first few hexcoder tutorials, but later on I'll work on a specific small project of mine. Trying to put something together can be a way more effective learning experience than copying code around mindlessly, unless you don't have a clue on where to start.
Hopefully this was helpful to someone as it would have been to me.